Did you know that LED strip lights are becoming increasingly popular for their versatility and energy efficiency?
At some point, we may all find ourselves needing to cut these lights to fit specific spaces without causing any damage.
In this article, we will share our expertise on the best techniques for cutting LED strip lights without breaking them.
From the necessary tools to safety precautions and step-by-step instructions, we’ve got you covered.
So let’s dive in and ensure your cutting process is precise and successful!
Key Takeaways of How Do You Cut LED Strip Lights Without Breaking Them
- Use sharp cutting tools and measure accurately to avoid breaking LED strip lights.
- Apply even pressure and use heat shrink tube or electrical tape for protection when cutting LED strip lights.
- Understand wiring and soldering techniques when connecting cut LED strip lights.
- Test LED strip lights before permanent installation and follow best practices to avoid common mistakes.
Understanding LED Strip Lights
LED strip lights are a popular choice for adding decorative lighting to any space. When it comes to LED strip light installation, there are several benefits to using these versatile lights.
Firstly, LED strip lights are energy-efficient, consuming less power compared to traditional lighting options. This not only saves on electricity costs but also reduces environmental impact.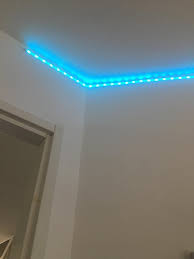
Additionally, LED strip lights have a long lifespan, lasting up to 50,000 hours or more, which means less frequent replacements and maintenance. These lights also emit very little heat, making them safe to handle and minimizing the risk of fire hazards.
With their flexibility and adhesive backing, LED strip lights can be easily installed in various areas such as under cabinets, along staircases, or even outdoors for accentuating landscapes.
Overall, LED strip lights offer an efficient and effective way to enhance the ambiance of any space while providing numerous practical benefits.
Tools You’ll Need for Cutting LED Strip Lights
When it comes to cutting LED strip lights, having the right tools is essential. We need to carefully choose our cutting tools to ensure precise and clean cuts without damaging the LED strips.
In this discussion, we will explore the essential cutting tools needed for working with LED strip lights and share tips on how to avoid damaging them during the cutting process.
Essential Cutting Tools
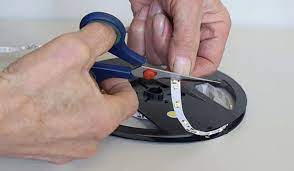
You’ll need a few essential cutting tools to trim the LED strip lights without damaging them.
The first tool you’ll need is a pair of sharp scissors or wire cutters specifically designed for cutting LED strips. These tools have fine blades that allow for precise cuts without crushing or fraying the delicate wires inside the strip.
Another useful tool is a soldering iron, which can be used to reattach any loose wires after cutting.
To ensure accurate measurements and straight cuts, a ruler or measuring tape is also necessary.
Additionally, having a steady hand and using slow, controlled movements while cutting will help prevent any accidental damage to the LED strip lights.
When using these tools for cutting, it’s important to exercise caution and avoid applying too much force as this can cause breakage or damage to the LEDs themselves.
Avoiding LED Strip Damage
To prevent any potential damage to your LED strip lights, it’s important to handle them with care and avoid excessive force during installation. LED strip lights are delicate electronic devices that require gentle treatment to ensure their longevity and functionality.
By avoiding rough handling and applying the appropriate amount of pressure when installing, you can prevent damage such as broken LEDs or disconnected circuitry. Achieving precision during installation is crucial for maintaining the overall quality of your LED strip lights. Take your time to align the lights properly and secure them in place using suitable mounting options. This will not only enhance the aesthetic appeal but also contribute to the durability of the lights.
Now let’s move on to discussing safety precautions to take before cutting LED strip lights.
Safety Precautions to Take Before Cutting LED Strip Lights
Before cutting LED strip lights, it is important to take necessary safety precautions. Here are some important tips to ensure safe cutting:
- Wear protective gear such as gloves and safety glasses.
- Make sure to turn off the power before handling the LED strip lights to avoid electric shock.
- Use a sharp and appropriate cutting tool, like scissors or a utility knife, for clean cuts without damaging the LEDs.
- Accurately measure and mark the desired length before cutting to avoid wasting materials.
By following these precautions, you can minimize the risk of accidents and damage to yourself and the lights.
Now that we understand the importance of safety, let’s move on to a step-by-step guide on how to cut LED strip lights properly.
Step-by-Step Guide to Cutting LED Strip Lights
When it comes to cutting LED strip lights, it is crucial to employ proper cutting technique in order to achieve clean and accurate results.
In addition to skillful execution, having the right tools for the job is essential. By using a sharp pair of scissors or a precision knife, one can ensure a smooth and precise cut without causing any damage to the LED strip lights.
Proper Cutting Technique
Make sure you’re using a sharp pair of scissors or a utility knife to cut your LED strip lights without causing any damage. We understand that mistakes can happen, so here are some troubleshooting tips to help you avoid them:
- Measure twice, cut once: Double-check your measurements before making any cuts to ensure accuracy.
- Cut along the designated lines: Most LED strip lights have cut marks indicating where it’s safe to make a cut.
- Apply steady pressure: Use controlled and even force when cutting through the strip to prevent accidental damage.
- Inspect the connection points: After cutting, inspect the connection points for any loose wires or damaged soldering.
Tools Required for Cutting
Using a sharp pair of scissors or a utility knife is essential for cutting your LED strip lights without causing any damage. These tools provide the precision and control needed to make clean cuts, ensuring that your strips remain intact and functional.
When it comes to cutting curved strips, there are a few techniques you can employ to achieve accurate results. One method is to use a flexible ruler or template as a guide while cutting. This helps maintain the desired shape and prevents any accidental mistakes. Another technique is to score the strip lightly with a utility knife before making the final cut, allowing for easier bending and reducing the risk of breakage.
By employing these tools and techniques, you can achieve precise cuts on both straight and curved LED strip lights.
Now that we have discussed the necessary tools for precise cutting and techniques for cutting curved strips, let us move on to the next section about preventing damage while cutting.
Preventing Damage While Cutting
To prevent any accidental mistakes, it’s important to employ the techniques discussed earlier when cutting your LED strip lights. Here are four key cutting techniques that will help you prevent damage and ensure a successful cut:
- Measure Twice: Before making any cuts, measure the length of the strip light carefully and mark the desired cutting points accurately. This will help you avoid any unnecessary errors.
- Use Sharp Tools: Use a sharp pair of scissors or a utility knife specifically designed for cutting LED strip lights. A dull tool may cause fraying or uneven cuts, leading to potential damage.
- Cut Along the Marked Line: When making the cut, follow the marked line precisely and apply consistent pressure to ensure a clean and straight cut without damaging the circuitry or components embedded in the strip.
- Seal The Ends: After cutting your LED strip lights, it’s essential to seal off exposed ends using silicone glue or heat shrink tubing to protect against moisture and prevent short circuits.
Tips for Achieving Clean and Precise Cuts on LED Strip Lights
If you want clean and precise cuts on your LED strip lights, you should be careful not to rush the process. Cutting techniques play a crucial role in achieving accurate results without damaging the lights.
One important technique is using sharp and appropriate tools like a sharp utility knife or wire cutters. Ensure that you have measured and marked the cutting points accurately before starting. When cutting, apply even pressure and make slow, controlled movements to avoid any accidental slips or uneven cuts.
Troubleshooting issues may arise if the cuts are not clean, such as damaged solder pads or exposed wires. To prevent this, it is recommended to use a heat shrink tube or electrical tape to cover the cut ends for added protection.
Following these tips will help you achieve precise cuts on your LED strip lights without any trouble.
Now that we have discussed how to achieve clean and precise cuts on LED strip lights, let’s move on to the next step: connecting cut LED strip lights.
How to Connect Cut LED Strip Lights
When it comes to connecting cut LED strip lights, it is crucial to ensure a correct connection in order for them to function properly.
This involves understanding the correct wiring and soldering techniques to establish a secure and reliable connection.
To achieve this, we recommend using specialized tools such as wire strippers, soldering irons, and heat shrink tubing for a clean and professional finish.
Correct Connection After Cutting
After cutting the LED strip lights, it is important to reconnect them correctly. This is crucial for their functionality and longevity. Here are some correct connection techniques to follow and troubleshooting tips to address any connection issues:
- Align the cut ends: Ensure that both ends of the cut LED strip lights have matching polarity markings for proper alignment.
- Use connectors: Utilize connectors specifically designed for LED strip lights, such as solderless connectors or wire nuts, to securely join the cut ends together.
- Check voltage compatibility: Verify that the power supply voltage matches the requirements of your LED strip lights to prevent electrical damage.
- Test before permanent installation: Before permanently mounting the reconnected LED strip lights, test them to ensure they are functioning properly.
By following these correct connection techniques and troubleshooting any issues, you can successfully reconnect your cut LED strip lights.
Now, let’s move on to discussing recommended tools for connection…
Recommended Tools for Connection?
Now that we know how to properly connect LED strip lights after cutting them, let’s discuss the recommended tools and best practices for a seamless connection. It is important to use the right tools to ensure a secure and reliable connection. Here are some recommended tools:
| Tool | Description | Purpose |
|---|---|---|
| Wire Cutters | Precision cutting of LED strip wires | To cut LED strip at desired length |
| Soldering Iron | Melts solder to join wires | Creates strong and durable connections |
| Heat Shrink Tubing | Insulates and protects soldered connections | Prevents short circuits and damage |
When using these tools, it is crucial to follow best practices such as:
- Measure twice, cut once: Double-check your measurements before cutting the LED strip.
- Clean cuts: Ensure clean cuts without damaging the copper pads.
- Proper soldering technique: Use a soldering iron with caution, following safety guidelines.
Common Mistakes to Avoid When Cutting LED Strip Lights
One common mistake to avoid when cutting LED strip lights is not measuring the length accurately. This can lead to wasted material and an improper fit for your desired installation area.
To ensure a successful LED strip light installation, it is crucial to follow best practices for placement. Here are four key tips to help you achieve optimal results:
- Measure twice, cut once: Take precise measurements of the area where you intend to install the LED strip lights before making any cuts.
- Use sharp tools: Invest in high-quality cutting tools specifically designed for cutting LED strip lights. Dull or inappropriate tools may cause damage or breakage.
- Cut along designated markings: Most LED strips have designated lines indicating where they can be cut safely. Follow these markings carefully to avoid damaging the circuitry.
- Test before finalizing: Before permanently installing your cut LED strip lights, test them first to ensure they are functioning properly and emitting the desired amount of light.
Alternative Methods for Cutting LED Strip Lights
To avoid any damage, try utilizing alternative techniques when trimming your LED strip lights. There are several creative uses for cut LED strip lights, and by using alternative cutting techniques, you can ensure that they remain intact and functional.
One alternative method is to use a sharp pair of scissors or a utility knife to carefully cut along the designated cutting lines on the strip. This technique allows for precise cuts without the risk of damaging the internal components.
Another option is to use soldering iron to remove sections of the strip. By heating up the solder joints, you can detach specific segments and create custom lengths without compromising the overall functionality of the strip.
Here is a table showcasing some alternative cutting techniques and their benefits:
| Technique | Benefits |
|---|---|
| Scissors/Utility Knife | Precise cuts without damaging internal components |
| Soldering Iron | Custom length creation while maintaining functionality |
| Laser Cutter | Clean, accurate cuts with minimal effort |
| Wire Cutters | Ideal for small-scale projects or trimming individual LEDs |
Troubleshooting Common Issues When Cutting LED Strip Lights
If you encounter any issues while cutting your LED strip lights, troubleshooting common problems can help you overcome them. Here are some steps to troubleshoot and fix two common issues: flickering and uneven brightness in cut LED strip lights.
- Check the power supply: Ensure that the power supply is compatible with the voltage requirements of your LED strip lights. A mismatched power supply can cause flickering or uneven brightness.
- Inspect the connections: Make sure all connections between the LED strips, connectors, and power source are secure and properly aligned. Loose or faulty connections can lead to flickering or inconsistent lighting.
- Verify strip length: Ensure that you have cut the LED strip lights correctly according to the manufacturer’s guidelines. Incorrectly cut strips may result in uneven brightness.
- Use an amplifier (for longer runs): If you’re experiencing flickering or dimming at longer distances from the power source, consider using an amplifier to boost the signal strength.
Proper Maintenance and Care for Cut LED Strip Lights
Proper maintenance and care are essential for ensuring the longevity and optimal performance of your cut LED strip lights. By following a few simple guidelines, you can maximize the lifespan of these lighting fixtures and avoid unnecessary replacements.
Firstly, it is crucial to handle cut LED strip lights with care. Avoid bending or twisting them excessively, as this can damage the delicate components inside. Additionally, always store your cut LED strip lights in a cool and dry place to prevent moisture damage.
To help you better understand how to maintain and care for your LED strip lights, we have provided a table below:
| Care Tips | Description |
|---|---|
| Regular Cleaning | Gently wipe down the surface of the strip with a soft cloth to remove dust or dirt buildup. |
| Avoid Overheating | Ensure that the temperature around the LED strips does not exceed their specified operating range. |
| Proper Power Supply | Use a compatible power supply that matches the voltage requirements of your LED strip lights. |
| Insulation | Apply an insulation coating if you plan on using the LEDs in outdoor or high-moisture environments. |
Frequently Asked Questions
Can I Use Regular Scissors to Cut LED Strip Lights?
When cutting LED strip lights, it is important to use the proper tools and techniques. Regular scissors are not recommended as they may cause damage. We suggest using wire cutters or a sharp utility knife for clean and precise cuts.
Is It Safe to Cut LED Strip Lights While They Are Still Plugged In?
Cutting LED strip lights while plugged in poses potential dangers. To avoid electrical hazards, always unplug them before cutting. This precaution ensures safety and prevents the risk of electric shock or damage to the lights.
Can I Cut LED Strip Lights to a Specific Length or Do They Have Predetermined Cutting Points?
LED strip lights can be cut to a specific length, but it’s important to find the predetermined cutting points. By following proper techniques and using the right tools, we can ensure precise cuts without risking damage.
What Should I Do if I Accidentally Cut Through the Copper Pads on the LED Strip Lights?
If we accidentally cut through the copper pads on the LED strip lights, we can try soldering them back together. However, if the lights stop working after cutting, it may be necessary to replace them.
Are There Any Special Considerations When Cutting Waterproof LED Strip Lights Compared to Non-Waterproof Ones?
When cutting waterproof LED strip lights, what are the special considerations? We must be cautious with our cutting techniques to avoid potential damage. Let’s discuss the best practices for cutting both waterproof and non-waterproof LED strip lights.
Conclusion
In conclusion, cutting LED strip lights can be a daunting task, but with the right tools and safety precautions, it can be done successfully. By following our step-by-step guide and implementing our tips for clean cuts, you’ll achieve professional-looking results.
Avoid common mistakes and consider alternative cutting methods if needed. Troubleshoot any issues that may arise during the process and remember to maintain and care for your cut LED strip lights properly.
With these techniques in mind, you’ll be able to enjoy the beauty of well-cut LED strip lights in your home or workspace.