Have you ever wondered why your LED light strips stop working after you cut them?
We’ve all faced the frustration of encountering this issue, but fear not! In this article, we will delve into the common mistakes people make when cutting LED light strips and provide solutions to help you troubleshoot.
Understanding voltage and current requirements, deciphering damaged circuitry, and learning proper cutting techniques are just a few key aspects we’ll cover.
So sit back, relax, and let us shed some light on this illuminating topic.
Key Takeaways Why Do LED Light Strips Not Work After Cutting
- Not properly sealing the ends with electrical tape and leaving them exposed to moisture, dust, and contaminants can cause LED light strips to not work after cutting.
- Cutting at the wrong points can cause a mismatch in voltage and LED light strips are sensitive to voltage fluctuations, so it is important to match the voltage requirements and ensure power supply compatibility with the cut section.
- Precision is crucial when cutting LED light strips, as cutting at incorrect points can damage the circuitry. It is important to follow manufacturer guidelines and use appropriate tools for clean cuts.
- Damaged circuitry can be caused by incorrect cutting techniques, excessive heat during soldering, poor quality solder joints, and insufficient insulation. Using proper techniques, such as avoiding cutting through copper pads and sealing exposed wires, can help prevent damage.
Common Mistakes When Cutting LED Light Strips
One common mistake you might have made when cutting LED light strips is not properly sealing the ends with electrical tape. This oversight can lead to several issues that affect the longevity and functionality of your LED light strip.
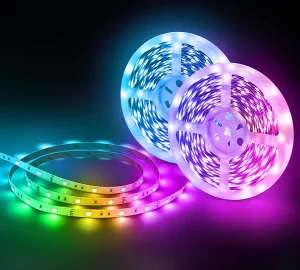
When the ends are left exposed, they are vulnerable to moisture, dust, and other contaminants that can damage the internal components. To prevent this, it is recommended to use electrical tape to seal the cut ends securely.
Additionally, using appropriate tools for cutting LED light strips is crucial in ensuring a clean and precise cut without damaging the circuitry. Tools such as wire cutters or sharp scissors specifically designed for cutting LED light strips are recommended for achieving optimal results.
Understanding these key steps will help you avoid potential problems with your LED light strip installation and ensure its proper functioning.
Now let’s move on to understanding voltage and current requirements…
Understanding Voltage and Current Requirements
When it comes to working with LED light strips, understanding voltage compatibility is crucial.
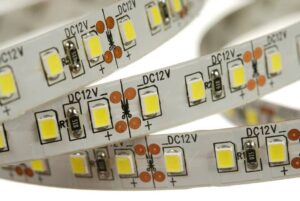
In order for the lights to function properly, it’s important to ensure that the voltage requirements of the LED strip match those of the power source.
Additionally, proper cutting techniques are essential to maintain the integrity and functionality of the light strip.
Cutting at the wrong points can lead to a mismatch in voltage and cause damage or failure of the lights.
Voltage Compatibility Explained
To ensure your LED light strips work properly after cutting, make sure the voltage of the power supply is compatible with the cut section. Voltage compatibility plays a crucial role in preventing issues such as flickering or complete failure of the lights. Here are four important points to consider:
- Voltage Fluctuations: LED light strips are sensitive to changes in voltage. Fluctuations can cause damage and lead to malfunctioning.
- Power Supply Compatibility: Ensure that the voltage output of your power supply matches the requirements of the cut section.
- Overloading Protection: Verify if your power supply has overloading protection to prevent damage from excessive current flow.
- Consistent Voltage Output: Use a regulated power supply to provide stable and consistent voltage throughout the length of the cut section.
Importance of Proper Cutting
Ensure that you pay attention to the proper cutting techniques to maintain the functionality of your LED light strips.
The importance of precision cannot be overstated when it comes to cutting LED light strips. These strips are designed with specific cut points, and if you don’t cut them correctly, you could damage the circuitry and render the strip useless.
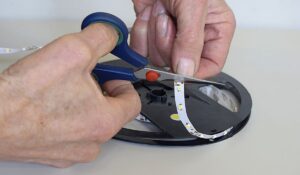
To ensure a clean cut, use sharp scissors or a fine-toothed saw, and make sure to follow the manufacturer’s guidelines for cutting.
Additionally, safety precautions should always be taken when working with electrical components. Before starting any cutting, disconnect the power source and handle the strips carefully to avoid any accidental damage or injury.
Damaged Circuitry: Possible Causes and Solutions
The most common reason why LED light strips do not work after cutting is due to damaged circuitry. When the strip is cut, there is a risk of damaging the wiring and disrupting the electrical flow. This can result in sections of the strip not lighting up or flickering intermittently.
To prevent this issue, it is crucial to use proper soldering techniques when reconnecting the cut ends. Here are four key factors that can cause damaged circuitry:
- Incorrect cutting technique
- Excessive heat during soldering
- Poor quality solder joints
- Insufficient insulation
By being mindful of these potential pitfalls and using proper techniques, you can avoid damaging the circuitry and ensure your LED light strips work flawlessly after cutting.
Now let’s delve into the proper techniques for cutting and reconnecting LED light strips.
Proper Techniques for Cutting and Reconnecting LED Light Strips
When it comes to cutting LED light strips, it’s important to follow proper techniques to ensure optimal performance.
In this discussion, we will explore the correct methods for cutting and reconnecting LED light strips, as well as address common issues that may arise during the process.
Cutting LED Light Strips
Cutting LED light strips may cause them to stop functioning properly. There are common mistakes that can easily be made when working with these strips. To ensure successful installation and avoid issues, here are some troubleshooting tips:
- Check the voltage requirements of your LED light strip before cutting.
- Use the appropriate tools, such as sharp scissors or a precision knife, to make clean cuts.
- Avoid cutting through the copper pads on the strip as this can disrupt the electrical connection.
- Seal any exposed wires with heat shrink tubing or electrical tape to prevent short circuits.
By following these tips, you can minimize the chances of encountering problems when cutting your LED light strips.
Now let’s move on to how you can reconnect them for optimal functionality.
Reconnecting LED Light Strips
To ensure optimal functionality after cutting, you can easily reconnect LED light strips using soldering or connector clips. Soldering is a common and reliable method that provides a secure connection between the cut ends of the LED light strip. Connector clips, on the other hand, offer an easier and faster solution without the need for any tools or soldering skills. These clips have small metal pins that pierce through the copper pads on both sides of the cut ends, creating a strong electrical connection.
Here is a table comparing soldering and connector clips:
| Method | Pros | Cons |
|---|---|---|
| Soldering | Strong connection | Requires soldering skills |
| Connector Clips | Easy to use, no tools required | May not be as secure as soldering |
Common Issues With Cutting LED Light Strips
One common issue with reconnecting LED light strips is that they may not work properly if the connection is not secure.
When it comes to cutting LED light strips for custom installations, there are a few important factors to consider. Here are some key points to keep in mind:
- LED Light Strip Color Options: LED light strips come in various colors, allowing you to choose the perfect one for your desired ambiance or design aesthetic.
- Cutting LED Light Strips: Cutting LED light strips allows you to customize their length and fit them into specific spaces. However, improper cutting can lead to functionality issues.
- Proper Cutting Techniques: It’s crucial to follow manufacturer guidelines when cutting LED light strips. Using incorrect tools or techniques can damage the strip and affect its performance.
- Reconnecting Cut Segments: After cutting an LED light strip, it’s essential to ensure a secure connection between the cut segments using appropriate connectors or soldering methods.
Troubleshooting Tips for LED Light Strips That Stop Working After Cutting
If your LED light strips stop working after being cut, there are a few troubleshooting tips you can try.
First, ensure that the power source is working properly by checking the connections and testing with another device. If the power source is functioning correctly, examine the cut sections for any loose or damaged wires. Reconnect any loose wires and insulate them with electrical tape if necessary.
It’s also important to verify that the cutting process did not damage any components on the strip itself. Inspect for burnt-out LEDs or broken solder points and repair as needed.
Lastly, make sure that all connections are secure and properly aligned when reconnecting the strips together. By following these troubleshooting steps, you can often resolve issues with LED light strips that stop working after cutting.
Now let’s move on to upgrading LED light strips: factors to consider before making cuts.
Upgrading LED Light Strips: Factors to Consider Before Making Cuts
Now that we have discussed troubleshooting tips for LED light strips that stop working after cutting, let’s shift our focus to the factors to consider before making cuts during an LED light strip installation.
It is essential to follow best practices when cutting LED light strips in order to ensure their proper functionality and longevity. Here are some key considerations:
- Proper measurement: Accurately measure the length of your desired lighting area before making any cuts.
- Cutting points: Identify the designated cutting points on the LED light strip, usually marked by scissor icons or copper pads.
- Precision tools: Use sharp scissors or a precision knife to make clean and straight cuts along the marked cutting points.
- Re-sealing ends: After cutting, seal the ends of the LED light strip with solder or heat shrink tubing to prevent damage and maintain electrical conductivity.
Frequently Asked Questions
Can I Cut LED Light Strips Anywhere Along the Length or Are There Specific Cutting Points?
Yes, you can cut LED light strips anywhere along the length, but there are specific cutting points for optimal functionality. Cutting at non-designated points may cause potential issues with the strip’s electrical connections and overall performance.
What Tools Do I Need to Cut LED Light Strips Properly?
To cut LED light strips properly, we need a sharp utility knife and a straight edge for precise cuts. Common mistakes to avoid include cutting through the copper pads and not sealing the ends properly.
Can I Reconnect Cut LED Light Strips Without Soldering?
Yes, you can reconnect cut LED light strips without soldering. There are alternatives to soldering such as using connectors or adhesive tape. These methods allow for easy reconnection and avoid the need for specialized tools or skills.
Are There Any Specific Safety Precautions I Should Take When Cutting LED Light Strips?
When cutting LED light strips, there are risks involved if not done correctly. It’s important to follow safety precautions such as using sharp tools, wearing protective eyewear, and disconnecting power. Alternatives to cutting include purchasing custom length strips or using connectors.
Can I Use Any Type of Wire to Reconnect Cut LED Light Strips or Are There Specific Requirements?
To extend the length of cut LED light strips without soldering, specific wire requirements must be met. It is crucial to choose the right wire gauge and material for proper conductivity. Additionally, sealing the ends correctly ensures optimal functionality.
Conclusion
In conclusion, cutting LED light strips requires careful attention to detail and proper techniques. Failure to understand the voltage and current requirements can lead to damaged circuitry and non-functioning lights.
However, with troubleshooting tips and knowledge of how to properly cut and reconnect the strips, users can overcome these challenges. It is important to consider factors such as upgrading options before making any cuts.
By following these guidelines, users will be able to enjoy the benefits of customized LED lighting without encountering issues along the way.
